Showing posts with label Kids. Show all posts

Saturday, July 9, 2011

Hi SugarPlum - Girls' Room Reveal

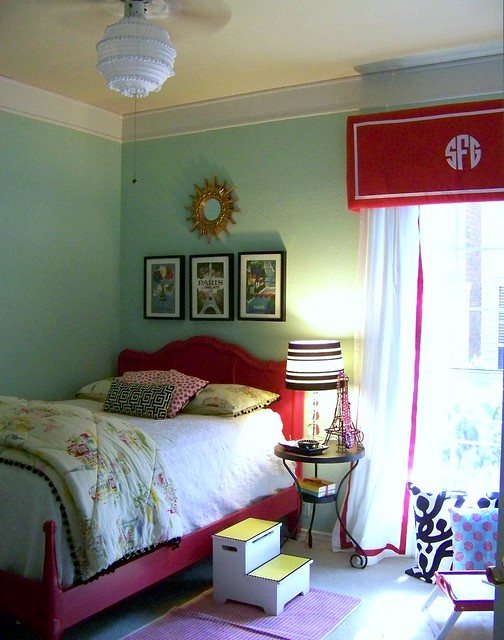
In the event you haven't seen this yet (WHERE HAVE YOU BEEN?!), I have to give a shout out to my sweet blog friend, Cassie.  Her daughter's room is beautifully done and it's pretty much DIY city!  A beautiful room full of French details and so much charm. Seriously, it doesn't look like it from the picture below but this tastefully done with just the right amount of Paris themed room is practically all DIY!

the room
Visit Cassie at Hi SugarPlum to get all of the DIY and thrifty details that went into this fun girly room:

  • Choosing a color scheme
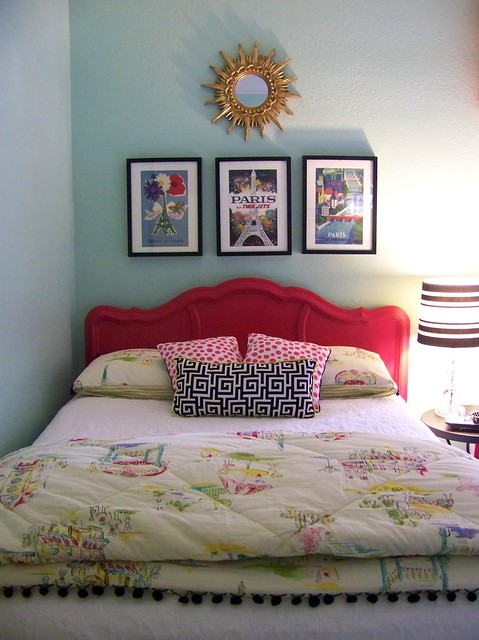
  • Painting a headboard a pretty pop of radish
bed
  • No sew pillows
  • Thrifty old sunburst mirror
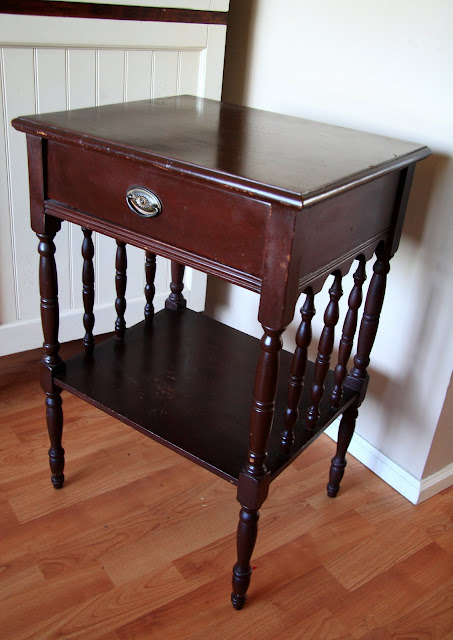
  • Borrowed table
  • DIY Eiffel tower jewelry stand
  • ModPodge step stool
  • Monogrammed window pelmet
100_4729
  • Breakfast tray to lap desk
  • Monogrammed tins for storage
  • Pom Pom lantern
  • Closet makeover
  • Handmade fabric banner
  • DIY Paris prints
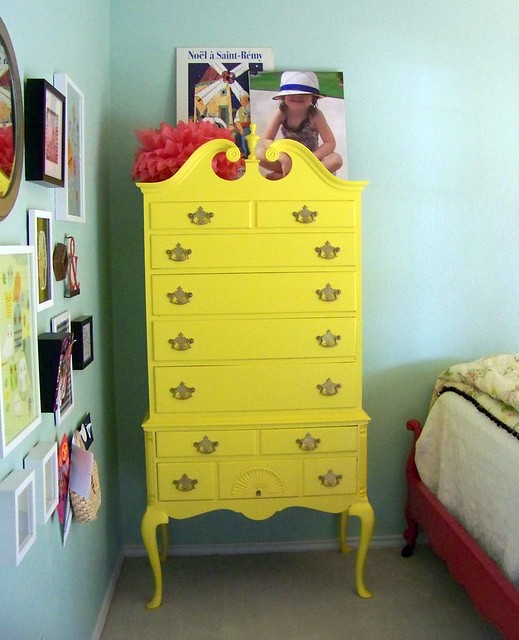
  • Beautifully painted highboy dresser
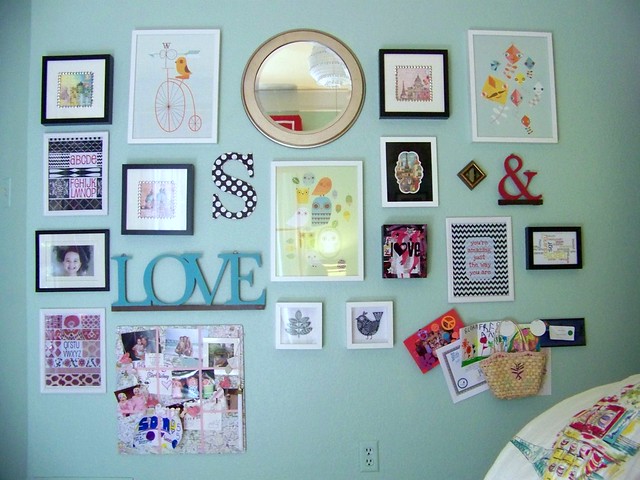
  • Fun DIY art and gallery wall
highboy

gallery 2
Doesn't this sweet room look like it's straight out of a pricey boutique catalog?  I think so!  Cassie, it's gorgeous. I'd love to follow your example and create a beautiful room completely designed with thrifty treasures and crafty DIY.  Great job, girl!
If you're not familiar with Hi SugarPlum, pop over to see the rest of her lovely home and awesome DIY skills. 
~*~*~*~
I'll be out of town most of next week.  If you'd like to show off your DIY projects in a guest post, send me an email and we'll discuss the details.  :)  TGIF!

Wednesday, July 6, 2011

DIY at The Pear Tree Cottage

Meet:  Becky from
The Pear Tree Cottage

Becky and her husband are DIYers who are on a mission to change their 1990s home into something they can be proud of.  

Beautiful Dining Room Transformation
This is what their house looked at the first time they saw it with the realtor:

Here is the amazing transformation...

Yes, the open doorway has been changed!  See all of the details here. Walls were knocked down, doorways were patched, new flooring and beautiful cottage decor.  Great job, Becky!

The boy's room got an awesome makeover too!
Before (previous owner's things)

After (chalkboard tutorial here) with more to come!
 
That chalkboard says it all! F~U~N!

And one last thing then you'll have to visit The Pear Tree Cottage to see more!

Fireplace Before and After

Before...

Gorgeous after...

Wait! That can't be the same room, can it?  It's magazine-worthy beautiful!  See the fireplace how-to for more details.

Hurray, Becky! You're doing an amazing job and creating a lovely home!  

~*~*~*~

Just a reminder about I <3 thrifting day.  Get the details here!

Thursday, June 30, 2011

Simply Klassic Little Girl's Room Makeover

Meet:  Kristin from
A Simply Klassic Home

Kristin's header tells you that she's learning to define her style on a budget and her latest project is the amazing result of her creativity and $200.  

Beautiful dresser makeover!  

before
After some sanding, paint, distressing and beautiful raggy fabric handles....

Finishing touches include a lovely print from her etsy shop and a little lamp dressing up in same pretty fabric as the handles...

Night stand before

Now...

See all of the details in her original posts below including before/after and cost breakdown:
  1. http://asimplyklassichome.blogspot.com/2011/06/big-girl-room-reveal-part-one.html
  2. http://asimplyklassichome.blogspot.com/2011/06/big-girl-room-reveal-part-2-furniture.html
  3. http://asimplyklassichome.blogspot.com/2011/06/american-tale-of-dresser.html


Wow, Kristin!  You're the queen of budget makeovers! Her entire room and all of the details are just so adorable!  Great job!


You can see more beautiful DIY + decorating at 


Here's a sneak peek at a few of my favorite posts:

Wednesday, May 11, 2011

Ewe-hoo! Fab DIY!

Meet:  Melanie from 
ewe hooo!

Melanie's family was quickly outgrowing their one story English Tudor home. It's in the historic district so they could not change the roofline without going through a ton of red tape, so they renovated our attic and utilized every possible inch of space they could. They added a room for their two boys to share, a bathroom and an office for her husband. There are lots of secret storage spaces that her kids and their friends love to use when playing hide and go seek. It took them 11 months to finish, but it was well worth it!

Before:


This space is beautiful!  Look at the gorgeous trim and arch! 
The character is a perfect fit for their home and so much fun!

MORE! Awesome hidden door!  Attic Makeover Details.

Fun boys' bathroom:

Wow!  Dear Melanie's boys, if I were "ewe", I'd never grow up! What a COOL space!

See more including these adorable party ideas (tea party, lego party, garden party)...


Beautiful art...

and the link to super cute printables in her etsy shop at


She'll inspire "ewe" to throw a party just for fun!

Wednesday, April 20, 2011

DIY Chalkboard

I've been hoarding saving an approx. 3'x3' smooth chipboard that was packaging/support trash in a furniture box.  I just can't part with certain 'trash', being a DIY-girl, frugal and all. If you're here browsing DIY ideas...you know what I mean. Don't deny it. I'm not the only one with a stash of trash for DIY, am I?  I knew that I'd have an idea for it someday.  That day has arrived!  My nephew, Austin, is getting a personalized chalkboard for his birthday.

Materials:


Recycled chipboard (Could also be directly applied to smooth walls with taping off a blackboard shape), Decor Art Americana Chalkboard Paint, Cutting Edge Stencil foam rollerDischangers x 2, Gorilla Glue tape - Handy 1" Roll, Vinyl decals, Chalk and eraser

Personalized Chalkboard Tutorial:

1.  Apply 1 coat of chalkboard paint rolling one direction (vertically) with a foam roller and let dry 1 hour.


2.  Apply 2nd coat of chalkboard paint.  Roll in the opposite direction (horizontally). Let cure for 24 hours.

3.  Flip board and attach Dishangers.  Wet finger and apply water to activate glue.  Dischangers aren't only for plates - they work with wood too!  I applied a Dischanger to each corner.  


Smooth and let dry 24 hours. 

 4.  Because this chalkboard is for a boy and hanging on a wall, I added STRONG Gorilla Glue tape to help with keeping the Dischangers extra secure (and to keep destructive little fingers from peeling off the Dischangers...just in case - you can never over-do caution.)


5.  Flip the board back over.  Apply vinyl decals.  


6.  Rub the side of a piece of chalk over the entire chalkboard area.


7.  Erase. (Back up eraser on stand by!)

I think my nephew is going to LOVE this!  I'll add a "Happy Birthday" message and be sporting this gift to Chuck E. Cheese next week!  Those with boys - do you think he'll love it?  (I'm mother of 2 girls, so sometimes I'm clueless with boys' gifts!) 

My other DIY chalkboard used the same paint technique but was applied directly to the wall in our kitchen...

Before:

After (except right now the kitchen is undergoing some changes so the ladder and chalkboard wall look the same but the other parts don't.  Reveal coming...someday! Hopefully soon.):
Join me in linking up your chalkboard project and checking out the great chalkboard ideas at Chalk Talk.